Quick Answer: Most Cummins ISM / QSM "dead ECM" complaints are not a failed module. They are a power, ground or 5V reference fault: an unswitched battery feed that drops under load, a corroded ground, or a shorted sensor pulling the 5V reference to ground so the ECM stops communicating. Check those three circuits and the J1939 termination before condemning the ECM. If the module really is dead, order by ESN and CPL — a blank ECM needs the correct calibration loaded with INSITE, and 4963807 family parts do not fit the ISX CM871 platform (3684275).
Table of Contents
Which ECM Number Fits Which Engine
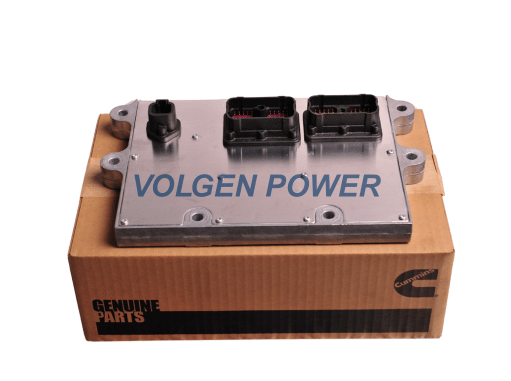
The 4963807 family is the CM875 / CM876 platform used on Cummins ISM, ISM11, QSM11 and QSN14 engines. The base number is 4963807; the letter suffixes identify the supply or remanufacturing status of the module, not a different engine platform.
| Number | What it identifies | Platform / note |
|---|---|---|
| 4963807 | Base ECM part number | CM875 / CM876, ISM / ISM11 / QSM11 / QSN14 |
| 4963807X | ReCon (remanufactured) module | Same platform; confirm the calibration before fitting |
| 4963807RX | ReCon variant with a different exchange classification | Same platform; the core and warranty terms differ |
| 4963807NX | ReCon variant used in some exchange programmes | Same platform; verify the number on the label |
| 4963808 | Related ECM number in the same family | Confirm by ESN and CPL; not a universal substitute |
| 3684275 | ISX CM871 ECM | Different platform — do not fit to an ISM/QSM harness |
Suffixes matter commercially: an X, RX or NX module is a remanufactured unit with a core charge and a defined warranty route. They are not "the same as new" for a fleet that needs a documented new-build module. Ask what the suffix means on the invoice before comparing prices.
Symptoms That Point at the ECM — and Symptoms That Do Not

A genuinely failed ECM usually gives no communication at all, no injector pulse and no start, and it does not recover when the harness is moved. A module that drops out intermittently, logs random sensor codes across unrelated circuits, or "comes back" after the batteries are charged is usually a supply or ground problem, not a dead processor.
| Symptom | More likely cause | First check |
|---|---|---|
| No communication, no start | Power, ground or ECM | Battery feed at the ECM connector, keyed feed, ground resistance |
| Random sensor codes on several circuits | 5V reference short or ground offset | Unplug sensors one at a time and watch the reference voltage |
| Drops out under load or over bumps | Harness chafe or loose ground | Wiggle test with a meter connected; inspect loom at the engine mount |
| No J1939 communication with the dash | Bus termination or wiring | Measure resistance across CAN high/low, engine off |
| Starts then derates | Sensor plausibility, not the ECM | Live data before condemning the module |
Step-by-Step Diagnosis
If the module communicates but the engine still will not start, our Cummins ECM reset guide covers the reset and relearn sequence before you replace hardware.
Step 1 — Battery constant power. Measure at the ECM connector with the key off and again while cranking. A feed that reads 12 V (or 24 V) at rest and collapses under load is a cable, fuse or battery problem. Check both the main feed and any secondary unswitched feed the harness carries.
Step 2 — Keyed power. Confirm the keyed feed appears and stays present while the key is in run and crank. A drop during crank is a common cause of a "no communication" complaint that looks like a dead module.
Step 3 — Grounds. Measure voltage drop from the ECM ground pins to the battery negative while cranking, not resistance with the meter at rest. A ground that looks fine on a continuity test can lift under load and take the reference voltage with it.
Step 4 — 5V reference. With the key on, measure the 5V reference at a sensor connector. If it reads near zero, disconnect sensors one at a time. A single shorted sensor can pull the whole reference down and make the ECM appear dead, because every sensor on that reference stops reporting. When the faulty sensor is unplugged, the reference returns and communication usually comes back.
Step 5 — J1939 termination. With the key off, measure resistance between CAN high and CAN low at the diagnostic connector. Two 120 Ω terminators in parallel read about 60 Ω. A reading near 120 Ω means one terminator is missing; a very low reading means a short. Repair the bus before replacing the ECM.
Step 6 — Communication check. Use a diagnostic tool that can see the ECM on the data bus. No communication with correct power, ground and termination points at the module or its connector. Check the connector pins for corrosion and pushed-back terminals before condemning it.
Step 7 — Injector and sensor outputs. If communication is present but the engine will not start, check whether the ECM is commanding injectors and seeing cranking RPM. No RPM signal is a crank sensor circuit fault, not an ECM fault.
Step 8 — Swap with a known-good module only as a last test. A test ECM must match the platform and be calibrated for the engine. Fitting an uncalibrated module can start the engine in a default mode and create new faults; record the original calibration first.
Blank or Pre-Flashed: What to Order
A blank ECM has no calibration for your engine. To make it run you need the engine serial number (ESN) and the CPL, plus a copy of the correct calibration and access to INSITE. Some suppliers pre-flash the module against the ESN you provide; others ship blank and leave the flash to the workshop. Neither is wrong, but the price and lead time differ, and a blank module fitted without a flash will not run the engine correctly.
- Send the ESN and CPL with the order, not after it ships.
- Ask whether the module is new, ReCon (X/RX/NX) or blank, and get it in writing.
- Confirm the calibration is included or that you have INSITE access and the file.
- Record the original ECM calibration before removal so the replacement can be matched.
Common Mistakes That Cost an ECM
Jump-starting a truck with the key on can spike the ECM supply. Welding on the chassis without disconnecting the batteries can do the same. A charger left connected while cranking, a reversed jump pack, or a body shop welding near the harness are the classic ways a healthy module is killed. Disconnect the ECM connectors before any welding and never use the ECM as a ground path.
The second costly mistake is replacing the module before checking the harness. A chafed loom at the engine mount, a corroded ground strap, or a pushed-back pin in the ECM connector produces exactly the same no-start symptom as a failed module. A fifteen-minute continuity and voltage-drop test is cheaper than a second ECM.
Bench Checks Before You Replace the Module
With the ECM removed, inspect the connector for corrosion, bent pins and heat marks. Check the mounting surface for a good ground path and the harness for a pulled wire at the back of the connector. If the module passes power, ground and communication checks with a known-good harness, and still does not respond, replacement is justified. Record the label number and suffix before sending the core back; the credit depends on it.
INSITE Flashing and Calibration Verification
A replacement ECM only becomes an engine controller after the correct calibration is loaded. The flash is engine-specific: the same 4963807 module can carry a different calibration for an ISM in line-haul service and an ISM in a mixer, and the wrong file produces the wrong torque curve, idle speed and emissions behaviour even though the engine starts.
Before flashing, record the original calibration from the old module if it still communicates. If it does not, take the calibration from the Cummins record using the ESN and CPL. Connect INSITE, confirm the ECM part number and serial that the tool reads, then load the file that matches the engine. Do not use a calibration copied from another truck "because it runs well".
- Confirm battery voltage is stable during the flash; a voltage drop mid-write can brick the module.
- Use a wired connection, not a marginal wireless adapter, for a full calibration write.
- After the flash, clear faults, cycle the key, and re-read the ECM identity to confirm the file took.
- Run the engine through idle, no-load and loaded checks; verify rated speed and derate behaviour.
- Record the new calibration number and the ESN in the service file.
A calibration that will not write usually means a voltage problem, a locked module or a file for the wrong CPL. Read the tool error before retrying; repeated failed writes are how good modules are damaged.
Ordering Checklist
Before you buy, confirm: the engine family (ISM / ISM11 / QSM11 / QSN14), the ECM label number and suffix, the ESN, the CPL, whether the module is blank or flashed, and the connector keying. If the label is missing, photograph the connector and the mounting pattern and send the ESN — the ECM can be identified from the engine record. Do not accept a 3684275 module for an ISM application; it belongs to the ISX CM871 platform.
Sourcing and Quality Inspection from Volgen Power
Volgen Power supplies Cummins ECM modules through the Shiyan commercial vehicle supply chain. Electronic modules are inspected and packed differently from castings: connector condition, label identity and anti-static packing decide whether the unit survives transport.
- Identity check. Label number, suffix and platform are matched to the order and the ESN record.
- Connector inspection. Pins checked for corrosion and damage; a bent pin is a returned unit.
- Anti-static packing. Modules ship in ESD bags with shock protection, not loose in a carton.
- Documentation. New, ReCon or blank status is stated on the invoice, with the warranty route.
Related reading: Cummins ESN and CPL identification guide · Cummins ECM 4963807 for ISM / QSM CM876 · Cummins engine parts
Frequently Asked Questions
What is the difference between 4963807 and 4963807X?
4963807 is the base module number; the X suffix identifies a ReCon remanufactured unit on the same CM875/CM876 platform. The suffix affects exchange terms and warranty, not the engine family.
Will a 3684275 ECM fit my ISM?
No. 3684275 belongs to the ISX CM871 platform. Fitting it to an ISM/QSM harness will not work; order by ESN and the label number on the original module.
Why does my ECM look dead when a sensor is shorted?
A shorted sensor can pull the shared 5V reference to ground. Every sensor on that reference stops reporting and the module appears dead. Disconnect sensors one at a time and watch the reference return.
What resistance should J1939 show?
About 60 ohms across CAN high and CAN low with the key off, which is two 120-ohm terminators in parallel. A reading near 120 ohms means one terminator is missing.
Do I need INSITE after fitting a blank ECM?
Yes. A blank module needs the calibration for your ESN and CPL loaded before the engine will run correctly. Some suppliers pre-flash it; confirm that in writing before ordering.
Need the Right ECM for Your ESN?
Send the engine serial, CPL, the label number from the old module and a photo of the connector. We will confirm whether you need 4963807, a ReCon suffix or 4963808, and whether the unit ships blank or pre-flashed.
WhatsApp our parts desk: +86 188 7263 0128 — include ESN, CPL and quantity.