Quick Answer: Liner protrusion on a Scania DC13 is measured with the liner clamped down, not loose. Fit the liner with its seals, install the clamping tool and torque it to the specified figure, then use a depth dial gauge on the liner flange at four points (A, B, C, D) against the block deck. Record the lowest and highest reading per cylinder, compare with the protrusion range for your engine variant, and check the spread across adjacent cylinders. If a cylinder is low, correct it with the specified shim at the liner ledge — not by over-torquing the head — and if the counterbore is fretted or out of depth, machine or replace before shimming.
Table of Contents
- Why Liner Protrusion Decides Head Gasket Life
- What You Are Actually Measuring
- Tools and Setup
- Step-by-Step Measurement
- Reading the Numbers
- Counterbore Wear and Shim Repair
- Shim Selection
- Seals and Final Assembly
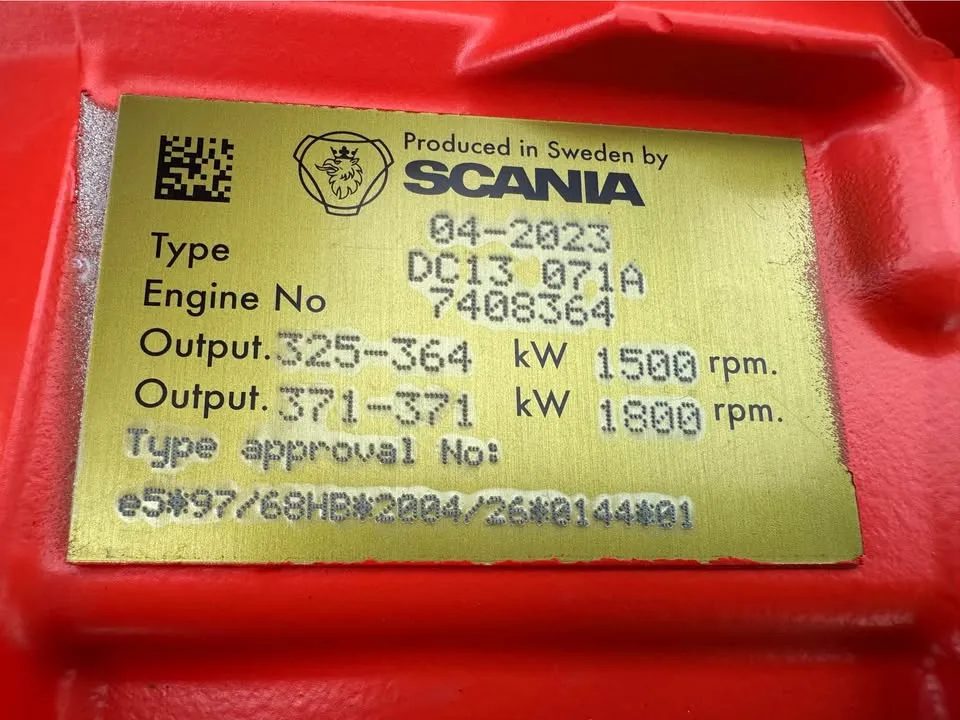
- OEM Cross-Reference and Identification
- Sourcing and Quality Inspection from Volgen Power
- Frequently Asked Questions
- Need a DC13 Liner Kit Matched to Your Engine Serial?
Why Liner Protrusion Decides Head Gasket Life
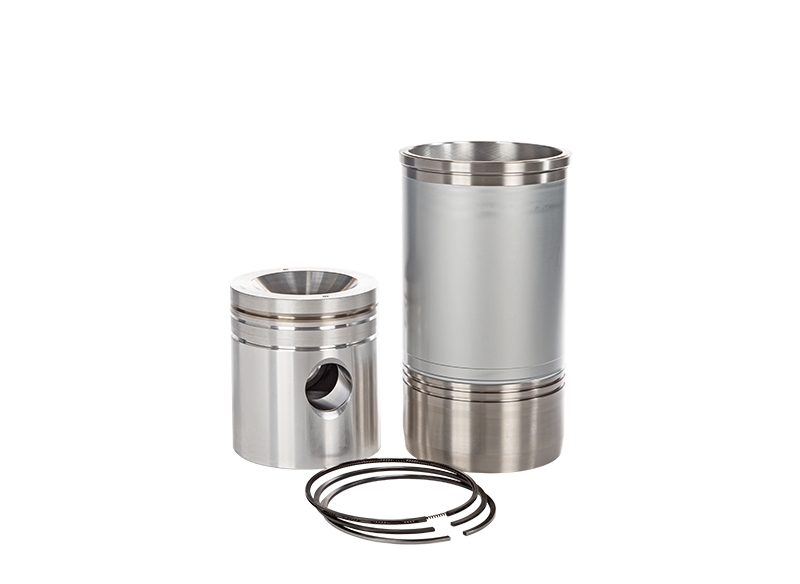
The DC13 is a 12.7 L inline-six with a 130 mm bore and wet cylinder liners. The liner is not just a wearing surface: its top flange is the surface the cylinder head gasket seals against, and the fire ring around each bore depends on that flange standing slightly proud of the block deck. That small stand-out is what concentrates clamp load on the fire ring instead of spreading it across the whole deck.
Get the protrusion right and the gasket seals combustion pressure, coolant and oil with normal head bolt load. Get it wrong in either direction and the failure is predictable:
- Too low: the fire ring is not loaded enough, combustion gas escapes past the gasket, and the gasket erodes from the inside out.
- Too high: the liner flange takes the clamp load on a narrow band, the gasket is crushed locally, and the liner or block deck can crack.
- Uneven across the four points: the head tilts on the liner flange, the gasket sees a differential load, and the leak starts at the low side.
- Uneven between adjacent cylinders: the shared deck section between two bores is loaded unevenly, which is where gasket failures and deck cracks usually appear.
Many DC13 liners also carry a carbon-scraper or flame-ring feature at the top — often called a saver ring — which keeps carbon from building up on the liner land and protects the top ring travel. That feature does not change the measurement method, but it does mean the liner must sit at the correct height and squareness: a liner standing proud on one side will let carbon pass and will scuff the bore.
What You Are Actually Measuring
Protrusion is the height of the liner flange face above the block deck, measured at the flange, not at the bore edge and not at the fire ring. On a wet liner the flange sits in a counterbore (also called the liner ledge or liner seat). The depth of that counterbore plus the flange thickness sets the protrusion, which is why a worn or machined ledge changes the number even when the liner is new.
Measure the deck surface first. If the deck is not clean, flat and free of old gasket or sealant, every reading you take afterwards is fiction. Use a scraper and a fine stone, then wipe with a lint-free cloth and solvent.
Tools and Setup
- Depth dial gauge with a flat bridge or a magnetic base that sits on the deck, resolution 0.01 mm.
- Liner clamping tool with the correct adapter for the DC13 flange, and a torque wrench that is in calibration.
- Clean straight edge and feeler gauge for a quick deck check.
- Micrometer or depth gauge for the counterbore depth when the ledge is suspect.
- A written measurement sheet — one row per cylinder, four columns for A, B, C and D.
Zero the gauge on the deck beside each measurement point, not once for the whole engine. The deck can vary slightly along its length, and a single zero will put that variation into your protrusion number.
Step-by-Step Measurement
Step 1 — Clean the counterbore. Remove all old seal and carbon from the ledge. Any debris under the liner flange becomes a false protrusion reading and a leak path.
Step 2 — Fit the seals and the liner. Lubricate the O-rings with the specified assembly lubricant, seat the liner by hand, and check that it sits square in the bore. Do not drive it down with a hammer; a distorted liner will not measure correctly and will not seal.
Step 3 — Install the clamping tool. Fit the clamping fixture over the liner flange and torque it to the value specified for the tool and the engine. The clamp reproduces the load the head will apply. Measuring an unclamped liner gives a higher, meaningless number.
Step 4 — Measure four points (A, B, C, D). Place the gauge bridge on the deck and the probe on the flange face at four points 90° apart. Record each reading. A, B, C and D should be close to each other; the difference between the highest and lowest is the flange tilt.
Step 5 — Repeat for every cylinder. Write the numbers down as you go. Do not average mentally and do not skip a cylinder because it "looked fine" — the low cylinder is usually the one nobody measured.
Step 6 — Compare with the specification. Use the protrusion range for the specific DC13 variant, not a generic figure. Volgen's workshop reference for this family sits in the region of 0.20–0.27 mm, but the authoritative number is the one in the Scania service information for the engine you are rebuilding.
Step 7 — Check the spread between adjacent cylinders. Even when every cylinder is inside the range, a large step between neighbours loads the deck unevenly. Keep the spread within the OEM limit and re-check any pair that differs visibly.
Step 8 — Remove the clamp and confirm the seating mark. The liner flange should show even contact around its face. A contact mark on one side only means the ledge or the flange is not square — fix that before shimming.
Reading the Numbers
| What you see | What it usually means | Correct action |
|---|---|---|
| All four points inside the range and close together | Ledge and liner are square and at the right height | Proceed to assembly |
| All four points low by a similar amount | Ledge cut too deep, or a thinner flange liner fitted | Fit the specified shim; re-measure after fitting |
| All four points high | Debris under the flange, wrong liner, or a raised ledge | Clean and re-seat; if still high, check the liner against the OE number |
| One side low, opposite side high | Liner not square, damaged flange, or a tapered ledge | Do not shim a tilted liner; correct the seat or replace the liner |
| One point low with a fretting mark at the ledge | Ledge wear from liner movement | Measure ledge depth; shim or machine per the OEM procedure |
| Adjacent cylinders at opposite ends of the range | Deck or ledge variation across the block | Re-check the deck and the ledge depths; correct before assembly |
The clip below shows a DC13 liner being pulled from the block. Watch the flange and ledge area: that is where the protrusion measurement and the shim decision begin.
Counterbore Wear and Shim Repair
The liner ledge takes a small amount of movement in service, and over a long life it frets. The result is a ledge that is deeper than when it was machined, sometimes with a step or a polished ring. A new liner in a worn ledge sits low, and no amount of head bolt torque will fix that.
If the block history is unclear, confirm its identity with our Scania DC13 cylinder block identification guide.
Measure the ledge depth with a depth micrometer at several points around the counterbore. If the depth is uniform but too deep, a shim of the calculated thickness restores the protrusion. If the depth is not uniform, or the ledge is cracked or badly fretted, the block needs the ledge machined to a controlled depth with an oversize liner or a replacement block — a shim cannot correct a tapered seat.
Shim Selection
| Measured condition | Shim action | Check after fitting |
|---|---|---|
| Protrusion low by a small, uniform amount | Fit the shim thickness that brings the flange into the specified range | Re-measure all four points with the clamp fitted |
| Protrusion low by more than one shim step | Check the ledge depth; use the OEM-approved shim stack or machine the ledge | Do not stack shims beyond the OEM allowance |
| Protrusion high after cleaning | No shim; investigate the liner number and the ledge | Confirm the liner is the correct part for the variant |
| Protrusion varies around the flange | No shim until the seat is corrected | Re-check squareness and contact pattern |
Shims are a correction, not a design feature. If a block needs a shim on every cylinder, suspect that the deck or the ledges have been machined before, and check the block's history before assembling it.
Seals and Final Assembly
The liner seals do the coolant sealing; the protrusion does the combustion sealing. Fit new seals every time a liner is disturbed, lubricate them with the specified lubricant, and keep the liner square as it goes in. Re-check protrusion after the head is torqued on the first cylinder you assemble, as a process check, then complete the sequence.
OEM Cross-Reference and Identification
The numbers below were cross-checked against current public parts catalogues. Scania changed liner suppliers and superseded numbers over the production life of the DC13, so always confirm the final number against the engine serial and the liner that comes out of the block.
| Number | Type | Notes |
|---|---|---|
| 2254875 | Scania cylinder liner | Listed as a DC13-family liner and in the 89935110 cross-reference set |
| 2147721 | Scania cylinder liner | Same cross-reference set; confirm flange type against the old liner |
| 2087718 | Scania cylinder liner | Same cross-reference set |
| 2043067 | Scania cylinder liner | Earlier number in the same family; check supersession |
| 2542544 | Scania cylinder liner | Appears in the same cross-reference list |
| 89935110 | Kolbenschmidt liner | Aftermarket equivalent with the Scania numbers above in its OE list |
| 061LW00120001 | Mahle liner reference | Aftermarket reference in the same cross-reference set |
| 1.33176 | DT Spare Parts reference | Aftermarket reference in the same cross-reference set |
| 2188199 | Liner seal ring | 142.5 × 3.35 mm class seal used on DC09/DC13/DC16 families — confirm per groove |
One caution from our own checking: 2031033 circulates in some lists as a liner number, but public catalogue data shows it as a seal ring (Elring 743.401 alongside 2188199). Do not order it as a liner. If a supplier quotes a liner number you cannot match to the engine serial, ask for the supersession chain and a photo of the number on the part.
Sourcing and Quality Inspection from Volgen Power
Volgen Power supplies DC13 liner and piston kits through the Shiyan commercial vehicle supply cluster in Hubei, where casting, machining and coating suppliers work within a short distance of each other. For a wet liner the inspection points that matter are the ones that decide whether it seals and wears evenly:
- Material and casting check. The liner batch is checked against the ordered grade and the heat number is recorded against the shipment.
- Dimensional check. Flange thickness, flange squareness, bore diameter and ovality are measured before packing.
- Surface finish. The bore finish is checked against the specification for the piston ring pack being supplied; the wrong cross-hatch ruins oil control.
- Seal kit. O-rings are supplied as a matched set for the liner groove, not as generic rings.
- VCI packing. Liners are oil-protected and wrapped for sea freight; a rusted bore is a rejected shipment.
- Traceability. The batch record links the liner to its casting lot so a claim can be traced to a batch, not to a guess.
Related reading: Scania DC13 piston and cylinder liner kit · Scania engine parts · 2183414 cylinder head for Scania
Frequently Asked Questions
What is the correct liner protrusion for a Scania DC13?
It depends on the engine variant. Volgen's workshop reference for this family is around 0.20–0.27 mm, but the authoritative figure is in the Scania service information for your engine serial. Measure with the liner clamped and compare all four points, not just one.
Why must the liner be clamped before measuring?
The clamp reproduces the load the cylinder head applies. An unclamped liner can sit slightly high and give a reading that disappears once the head is torqued. Measure with the specified clamping tool and torque, then re-check after assembly.
Can I use shims to correct a low liner?
Yes, when the ledge is uniform and the shortfall is within the OEM shim allowance. A shim cannot fix a tapered, cracked or badly fretted ledge; that needs machining or a replacement block. Never stack shims beyond the OEM allowance.
What happens if liner protrusion is too high?
The fire ring is crushed and the liner flange takes the clamp load on a narrow band. The head gasket can fail locally, and the deck or flange can crack. Check for debris under the flange, the wrong liner, or a raised ledge before assembly.
Do I need new liner seals every time?
Yes. O-rings take a set and are not reusable. Fit a matched seal set, lubricate with the specified assembly lubricant, and keep the liner square while seating it. Reusing a seal is a coolant leak waiting to happen.
Need a DC13 Liner Kit Matched to Your Engine Serial?
Send the engine serial, the liner number from the old part and a photo of the flange. We will confirm the correct liner and seal set, tell you whether a shim is likely to be needed, and quote the kit with the inspection record attached.
WhatsApp our parts desk: +86 188 7263 0128 — include engine serial, liner number and quantity. Or browse the DC13 piston and liner kit and the Scania engine parts range.